Use Google Calendar for booking appointments Link to this section
Appointment scheduling allows you to create online booking pages in Calendar. You set your dates and times, send the booking page to anyone who might want to sign up for an appointment with you, and let others choose the slot that works best for them. To help you and the people who book appointments with you stay organized, Google Calendar automatically sends confirmation emails, reminder emails, cancellation emails (if cancelled), and event update emails (if changes are made).
Most importantly, this improved appointment scheduling tool does not require people to have a Google account. It works with all email addresses and tools, allowing for equitable scheduling, available to all families and collaborators.
Please note that you must use a computer to set up appointment schedules, but others will be able to book appointments with you using their phone, tablet, or computer.
How to use appointment slots
Link to this section
Google Calendar is the district's primary calendaring tool, and you can use appointment slots for:
- parent/teacher conferences
- 1:1 staff check-ins
- counseling appointments
- student conferences
- booking a share resource, like a meeting room or a Chromebook cart
- and more!
Check out the expandable sections below to get started with appointment slots.
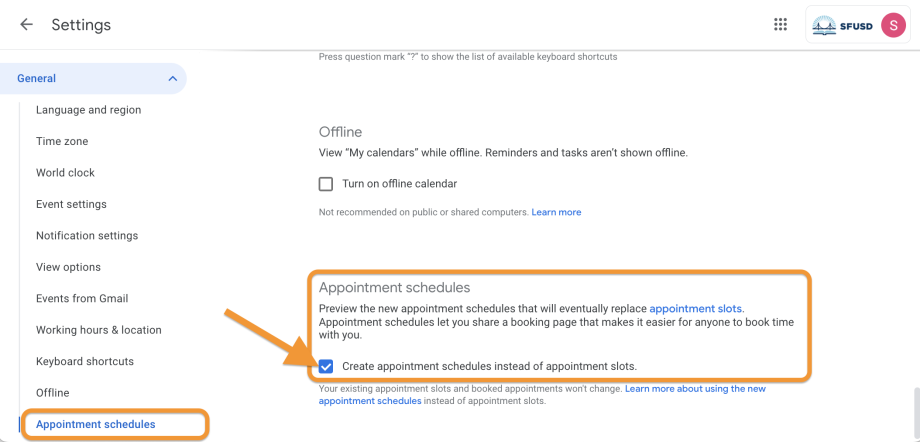
Do first: enable "appointment schedules"
You may have used Google's old appointment feature, called "appointment slots". This old feature is still the default in Calendar at the moment, so you'll need to switch your Calendar to using "appointment schedules" instead. This only has to be done once.
Go to Google Calendar and click on the settings gear in the top right corner. On the left bar, click on "Appointment Schedules", and check the box to switch from slots (old) to schedules (new).
Create an appointment schedule
Create an appointment schedule
- On a computer, open Google Calendar.
- At the top left, click Create
.
- Click Appointment schedule.
- Enter a title.
- The title is visible to anyone who has the link to your booking page.
- The title appears on your calendar for schedules and bookings.
- Set your appointment duration.
- To set a custom duration, next to “30 minutes,” click the Down arrow
.
- Appointments must be at least 15 minutes long.
- To set a custom duration, next to “30 minutes,” click the Down arrow
- Set the date and time of your appointments.
- You can set up a one-time appointment or a recurring schedule.
- To set how far in advance appointments can be booked, next to “Scheduling window,” click the Down arrow
.
- By default, someone can book an appointment with you anywhere from 12 hours to 60 days in advance.
- Click Next.
- Optional: You can change your photo, set where the meeting takes place, and more. Learn how to edit your appointment schedule.
- After you edit your appointment schedule, click Save.
Some tips:
- To create an appointment schedule, you can also click any time on your calendar that doesn't already have an event scheduled. In the window that appears, click Appointment schedule
Create a new appointment schedule or Add availability to an existing schedule.
- Google Calendar automatically avoids schedule conflicts. If you RSVP “Yes” or “Maybe” to an event in Google Calendar, that block of time won’t appear as free on your booking page.
- New appointments appear on your primary calendar.
Customize your appointment availability
- You can limit how people who book early or last-minute can book an appointment with you.
- You can limit the max number of appointments per day.
- You can customize the window for appointments.
- You can automatically add custom buffer time in between appointments.
- You can collect extra information from people who book appointments through the appointment booking form.
Share your appointment schedule
Important: Booking pages you create are public and aren't affected by your Calendar sharing settings.
Anyone with the link can view your booking page, Google profile photo, and account name. However, they cannot see the rest of your calendar.
Share a link to your appointment schedule
- On your computer, open Google Calendar.
- On your Calendar grid, click the appointment schedule.
- Next to “Open booking page,” click Share
.
- Under “Link,” select an option:
- To share a link for all services on your calendar, click All appointment schedules.
- To share a link for a specific service on your calendar, click A single booking page.
- Click Copy link
Add an appointment schedule button to your website
- On your computer, open& Google Calendar.
- On your Calendar grid, click the appointment schedule.
- To share the link, next to “Open booking page,” click Share
- Under “Website embed,” select an option:
- To create a button for all services on your calendar, click All appointment schedules.
- To create a button for a specific service on your calendar, click A single booking page.
- To open the “Button with popup” option, click Expand
- Optional: You can edit the button text and color.
- To add the button to your website, click Copy code.
- Paste the code into your website’s HTML.
- Click Done.
Embed the booking page onto your website
- On your computer, open Google Calendar.
- On your Calendar grid, click the appointment schedule.
- To share the link, next to “Open booking page,” click Share
- Under “Website embed,” select an option:
- To create a button for all services on your calendar, click All appointment schedules.
- To create a button for a specific service on your calendar, click A single booking page.
- To open the “Inline booking page” option, click Expand
- Optional: You can edit the width and height of your booking page.
- To embed the booking page directly onto your website, click Copy code.
- Paste the code into your website’s HTML.
- Click Done.
Important things to know
How your appointment schedule syncs with your calendar
Your appointment schedule syncs automatically with Google Calendar.
- Your appointment schedule and booked appointments automatically appear on your calendar.
- By default, schedule conflicts for events to which you responded "Yes" or "Maybe" are avoided.
- Your booking page availability automatically updates to avoid conflicts with other events on your primary calendar.
Calendar visibility with appointment schedules
- If you share your booking page, but not your calendar, others can’t view events on your calendar.
- If you share your calendar with others, they can't view your appointment schedule.
- Anyone with your booking page link can view the times you’re available.
- Once created, booking pages are public (not your entire calendar, just the booking page). Anyone with the link can view your:
- Booking page
- Profile photo - how to change your profile photo
- Account name - set by SFUSD
More resources
- How to require email verification for appointments - please keep in mind that using this feature may prevent people/families without an email account from booking an appointment
- How others join your Google Meet conferencing appointments
- Google Meet is a district-approved video meeting tool that works seamlessly with Google Calendar.
- If you want to use Zoom for a meeting, there are some extra steps:
- When you first create the appointment, select None/ to be specified for "Location and conferencing".
- After the appointment is booked by someone, edit the booked event to add the Zoom link and info.
- How to delete available appointments & cancel booked appointments
- How to customize your appointment availability
This page was last updated on October 11, 2022